

Getting Started with SageMaker Unified Studio: A Step-by-Step Guide for Generative AI Application Development
Amazon SageMaker Unified Studio has introduced an exciting update, making it easier than ever to create, deploy, and manage generative AI applications. This blog is designed to guide you through the process of building a Generative AI Application Development project using SageMaker’s latest tools. With step-by-step instructions, examples, and visuals.
Amazon SageMaker Unified Studio has introduced an exciting update, making it easier than ever to create, deploy, and manage generative AI applications. This blog is designed to guide you through the process of building a Generative AI Application Development project using SageMaker’s latest tools. With step-by-step instructions, examples, and visuals.
Overview of the New SageMaker Unified Studio
The new SageMaker Unified Studio divides projects into three modules:
- Data Analytics and AI-ML Development: Ideal for building machine learning models and analyzing large datasets.
- Generative AI Application Development: Focused on creating interactive AI-powered applications.
- SQL Analytics: Helps users perform SQL-based data analysis.
For this tutorial, we’ll focus on Generative AI Application Development. If you’re interested in building chatbots, smart assistants, or any AI app that can generate responses, this is the perfect module for you.
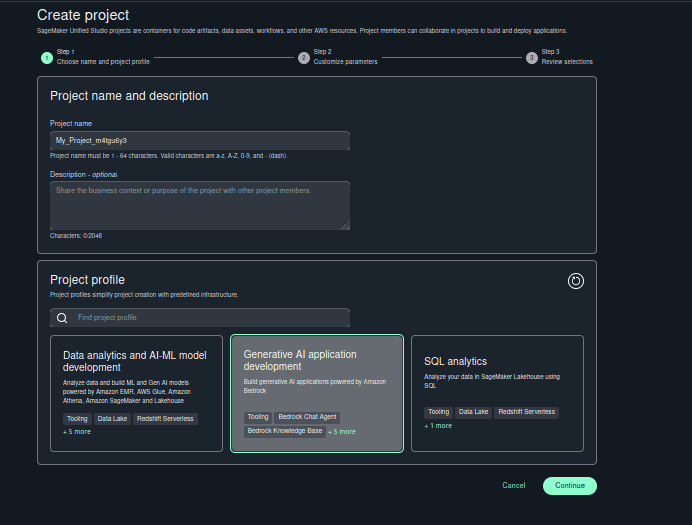
Step 1: Create Your Project
1. Navigate to SageMaker Unified Studio
- Log in to your AWS account and open Amazon SageMaker Platform.
- Go to your created domain
- In the dashboard, select Create Project.
2. Select a Project Type
- Choose Generative AI Application Development from the three available modules.
3. Set Up Your Project
- Give your project a name (e.g., My_Generative_AI_App)
- Select the pre-configured environment for generative AI tools.
Click Continue and wait for the environment to initialize.
Step 2: Build the AI Workflow with Flow
The Flow feature in SageMaker lets you create AI workflows visually. Think of it as connecting building blocks to make your AI application work.
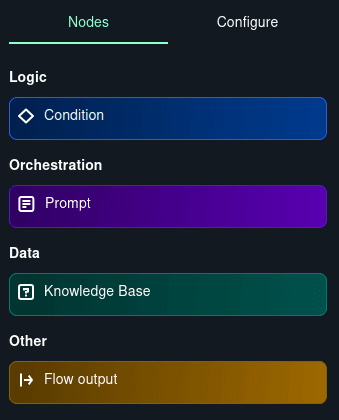
1. Add a Knowledge Base Node
- Drag the Knowledge Base node into your flow.
- Configure the node by selecting an existing knowledge base or creating a new one.
2. Add a Prompt Node
- Drag the Prompt node and connect it to the Knowledge Base node.
- The prompt node uses generative AI models (e.g., Amazon Titan or Claude) to process input and generate responses.
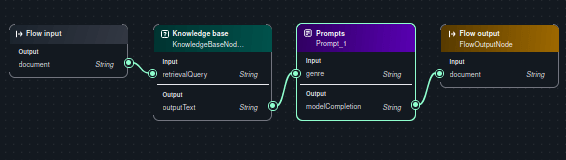
3. Connect Inputs and Outputs
- Add an Input Node to accept queries or commands (e.g., “List songs in the Jazz genre”).
- Add an Output Node to display the AI’s response.
- Link all nodes in a logical sequence, ensuring that inputs flow through the Knowledge Base and Prompt before reaching the Output.
What Happens in the Flow?
When a user enters a query:
- Input Node takes user input.
- Knowledge Base fetches relevant data.
- Prompt processes the query using an AI model.
- Output Node displays the result in a user-friendly format.
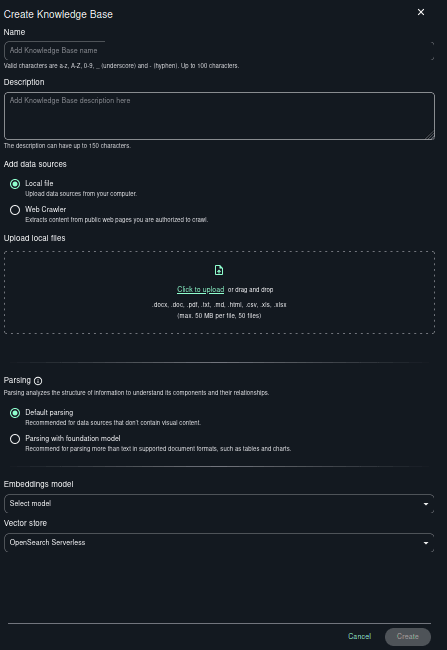
Step 3: Create a Knowledge Base
The Knowledge Base is where your application stores and retrieves data. For example, if you’re building a music assistant, you can upload a dataset of songs.
1. Upload Your Data
- Go to the Knowledge Base section and select Create Knowledge Base.
- Give it a name (e.g., songs_base).
- Upload your files (e.g., .csv, .xlsx, .json). Supported file types include text, tables, and charts.
2. Configure Parsing
- Choose Default Parsing for simple text files.
- For structured data like charts or tables, select Parsing with Foundation Model.
3. Add an Embedding Model
- Select an embedding model to transform your data into a format suitable for AI understanding. Amazon Titan is a good starting point.
Click Create to finish setting up your Knowledge Base.
Step 4: Craft Prompts
Prompts define how the AI responds to user inputs. You can create, test, and version prompts directly in the Prompt Editor.
1. Create a Prompt
- Go to the Prompt Editor in the left panel.
- Enter a prompt message, such as: Count the number of songs in the {{genre}} genre.
- Use {{}} for dynamic variables. These variables will be replaced with user inputs during runtime.
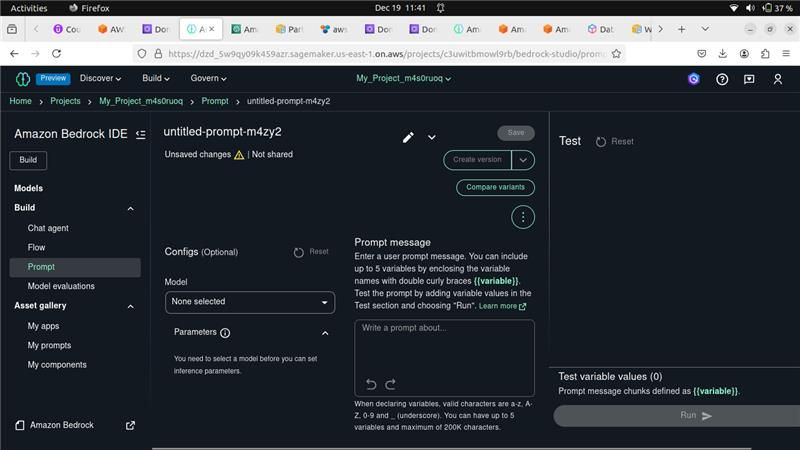
2. Test Your Prompt
- Enter test values for the variables (e.g., genre = “Jazz”).
- Run the prompt to see the AI’s response.
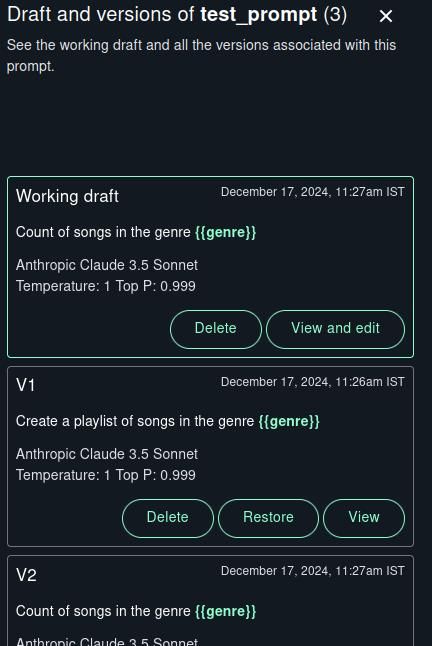
3. Version Control
- Save multiple versions of your prompt.
- Compare, restore, or delete versions based on their performance.
Step 5: Configure a Chat Agent
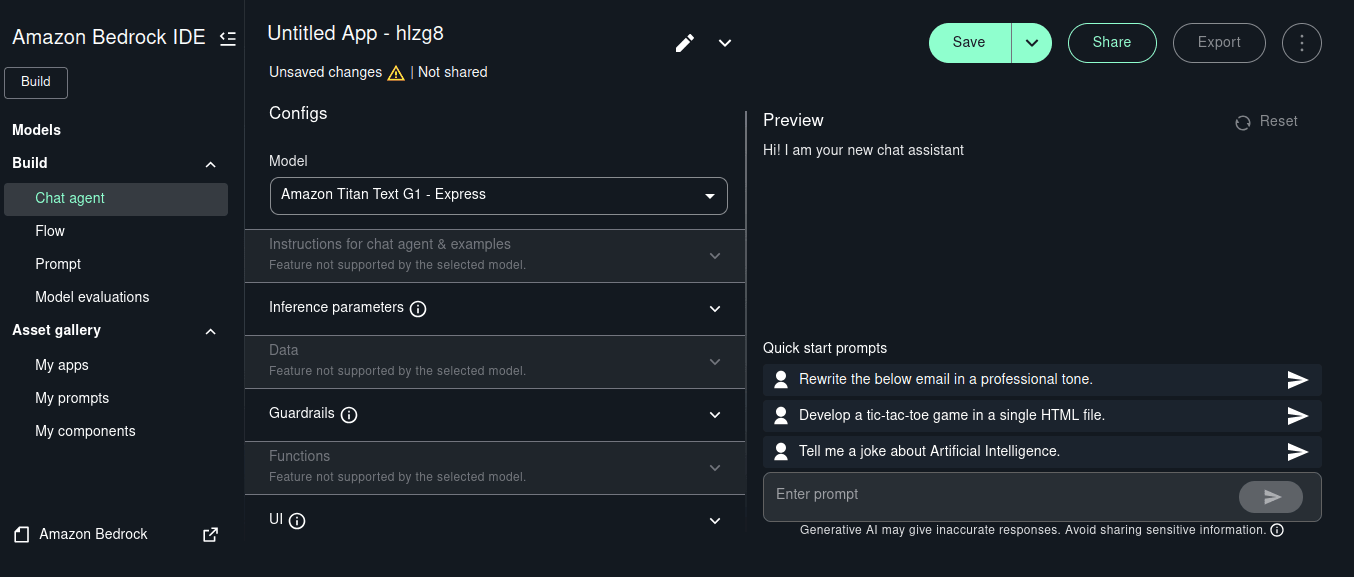
The Chat Agent is the final interface where users interact with your application.
1. Select a Model
- Choose a generative AI model like Amazon Titan or Claude.
2. Define Instructions
- Add guidance for the AI. For example: You are a music assistant. Answer questions about songs and genres clearly and concisely.
3. Set Parameters
- Adjust parameters like temperature to control the creativity of responses.
4. Test the Agent
- Use pre-built prompts or enter your own queries. For example: "List 5 rock songs from the 90s."
Step 6: Publish and Test Your Application
Once your workflow is complete:
- Test the flow end-to-end using the Flow Editor.
- Share the application with others by deploying it in SageMaker.
Read More: Amazon SageMaker Unified Studio 2024: Key Updates, New Features, and Why It’s Better
Why SageMaker Unified Studio is Great for Beginners
- No Coding Required: The visual interface makes it accessible to everyone.
- Modular Design: You can mix and match components like Knowledge Base and Prompt.
- Scalability: Ideal for small projects and enterprise-grade applications.
- AI-Powered: Leverages Amazon’s state-of-the-art generative AI models.
Conclusion
SageMaker Unified Studio has redefined how we build AI applications. With tools like Flow, Prompt, Knowledge Base, and Chat Agent, even beginners can create sophisticated AI solutions. We hope this guide inspires you to explore the platform and start your own generative AI project.
Transform your AI vision with LUMIQ's expertise in SageMaker Unified Studio.